4.4 File Upload
About File Upload
All Project Members are reminded to abide by the Platform Terms of Use, Data Sharing Agreements, and their obligations as Data Controllers when uploading files to the VRE.
All files uploaded to the VRE land in the Green Room storage. In this protected storage area Project Administrators can configure automated sanitization pipelines or other methods for pseudonymization of incoming files to ensure no sensitive personal information is transmitted to the VRE Core where broader research collaboration and analysis occurs.
How to Upload a File to your Project
Files can be uploaded individually or in bulk from the File Explorer.
- Navigate to the File Explorer in your Project, if you wish to upload files into an existing folder, click on the folder and any subfolders, and then click the Upload button in the File Explorer to open the Upload Files window.
- The Project name is pre-filled and cannot be modified.
- Check the entry to confirm you are about to upload data to the correct project. If not, close the window and return to the Landing Page to access the correct project
- Under Upload Files click either Select Files or Select Folder to add one or more files or a folder from your local computer.
- Optional: Project-specific information such as a Participant ID or other information specified by the Project administrator may also be requested on upload.
- Optional: Add File Tags by typing in the File Tags input box followed by pressing ‘Enter’. A dropdown will appear if the entered text matches any tags that are attached to any other files in the Project. The tags will turn blue when applied to the upload and can be removed using the x button.
- Optional: Select a File Attribute template from the dropdown list provided and fill out the attributes listed. File Attributes can only be added during upload if an Attribute template has already been created in the Project Settings page by a Project Administrator.
- Review the file list to verify that you have selected the correct files. If you need to remove a selected file, hover over the file name and click the trash can icon to Remove file.
- When ready, click Submit to begin uploading.
Once a file upload is initiated, you can check the status of your upload by clicking the File Status icon in the main menu.
For Projects preconfigured with an automated pipeline on file upload, please see File Processing.
Checking Upload Status
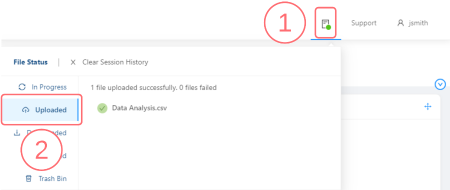
Once a file or folder upload is initiated the File Status window will open to show the status of the file or folder:
- Click the File Status icon in the Main Menu to view the status of your current upload.
- Click on the Uploaded tab to view all completed uploads from your current session.
To view your upload history from previous sessions, navigate to the File Stream on your Project Landing Page, and click Advanced Search. To search for uploaded files by their metadata click the search icon in the left-hand sidebar to access the File Query feature.
See Also:

Copyright © 2022, Indoc Research. This work is licensed under a Creative Commons Attribution-ShareAlike 4.0 International License.