How to access Project data in Guacamole VM using VRE CLT
VRE users are able to access to own projects' data in VRE workbench tool for further analysis, and push the outputs back to VRE projects by using VRE Command Line Tool.
1. Access to Command Line Tool within Guacamole VM
Please see VRE User Guide/Analyzing Data/Gucamole for additional details regarding:
- What is the Guacamole VM workbench tool?
- How can I request access to my Project's Guacamole VM workbench tool?
- How can I access the Guacamole VM and launch terminal?
To decide which VM you wish to enter, please be advised:
Within Guacamole VM, users can then launch VRE Command Line Tool to access to Project data for further analysis. The VRE Command Line Tool (CLI) is a binary executable program that provides a convenient way for users to perform file actions and platform-related tasks programmatically.
By typing vrecli in Guacamole VM terminal, users can launch the latest version of Command Line Tool:
Usage: vrecli [OPTIONS] COMMAND [ARGS]...
What's new (Version 1.4.0):
1. Support file annotation when uploading folder
2. Support PACS data integration with VRE
Options:
--help Show this message and exit.
Commands:
file File Actions
project Project Actions
user User Actions
2. User login through Command Line Tool
The commands users can input are categorized into groups of File, Project, and Users as shown in the above screenshot.
Users need to login to the VRE by their Charite AD credentials before performing any tasks through Command Line Tool, by typing vrecli user login, users are asked to provide user name and password:
Username: uname
Password:
Welcome to the VRE Command Line Tool!
3. Download Project data through Command Line Tool
a. The commands supporting the file related tasks are grouped within file , users can print help screen to preview which file related commands they are input by typing vrecli file --help:
Usage: vrecli file [OPTIONS] COMMAND [ARGS]...
Options:
--help Show this message and exit.
Commands:
attribute-export export attribute template from a given project
attribute-list check attributes of a given project
list List files and folders inside a given project/folder
sync Download file from a given project/folder/file
upload upload file to a given project file upload <file-
path>...
b. From the above screenshot, the command users can input to download Project data is file sync, let's take a look what options users need to provide in order to download a specific Project file/folder by typing vrecli file sync --help :
Usage: vrecli file sync [OPTIONS] [PATHS]... OUTPUT_PATH
Download file from a given project/folder/file
Options:
-z, --zone TEXT Target Zone, core/greenroom [default: greenroom]
--help Show this message and exit.
As part of the file downloading command, users are required to provide
- the target file/folder's path within the project, and
- the local path you want to save the downloaded file/folder
c. Example: a file of TEST_csv.csv can be downloaded from Indoc Test Project Core zone within the folder uname to user's Home Directory by typing vrecli file sync indoctestproject/uname/TEST_csv.csv . -z core
Preparing status: READY_FOR_DOWNLOADING
start downloading...
Downloading TEST_csv.csv |██████████████████████████████ 100% 00:00
File has been downloaded successfully and saved to: ./TEST_csv.csv
d. TEST_csv.csv is successfully downloaded to the Home Directory:
Desktop indoctestproject_1627578185.2418823.zip indoctestproject_zipped_1622255309.zip lder Public TEST_csv.csv test_folder.zip testing_data_0104.png
Documents indoctestproject_1628537735.1548965.zip indoctestproject_zipped_1622257377.zip Music uname test_folder_0909 testindoc.png thinclient_drives
Downloads indoctestproject_1631202299.1036603.zip indoctestproject_zipped_1622316277.zip Pictures Templates test_folder_test testing0529.png Videos
e. Trouble shooting. If downloading failed, please ensure:
- Whether your session expired for being inactive for an hour.
- Whether the target file/folder exists under correct path you provided from the portal.
- Whether you have access to the target file/folder:
- you need to be a member of the Project where your target file/folder is within, and
- your Project role is Project Administrator or Project Collaborator, who have the access to all files/folders within the Project Core zone.
4. Upload Project data through Command Line Tool
After grabbing Project data, users are then able to run containerized pipelines in Workbench Tools to analyze the data. The generated outputs can be uploaded back into the Project by the Command Line Tool.
a. Let's take a look what options users need to provide in order to upload a file or folder by typing vrecli file upload --help :
Usage: vrecli file upload [OPTIONS] [PATHS]...
upload file to a given project
file upload <file-path> -g <generate-id> -a <attribute> -p <project-code/folder> -t <tag>
-z <zone> -m <upload-message> -s <folder/source-file> --pipeline <pipeline> --zip --pacs
Options:
-p, --project-code TEXT Project Code
-g, --generate-id TEXT Generate ID (Only for project Generate)
-a, --attribute TEXT File Attribute Template
-t, --tag TEXT Add tag to the uploaded file
-z, --zone TEXT Target Zone, core/greenroom [default:
greenroom]
-m, --upload-message TEXT When upload processed files, must commit a
message to explain the purpose.
-s, --source-file TEXT The name of the source file of your processed
files.
--pipeline TEXT The processed pipeline of your processed files.
optional for source.
--zip Upload folder as a compressed zip file
--pacs Identify uploading data as pacs
--help Show this message and exit.
As part of the file uploading command, users are required to provide the options of:
- the target file/folder's path on your local, and
- the Project directory you want to upload the file/folder to
- the Project zone. By default, data should be uploaded to Green Room for pseudonymisation. However, data can also be uploaded directly into Core zone if the data is output of source data from Core zone, if this's the case, you need to confirm on the VRE Terms of Use to proceed the uploading.
- the upload message if upload to Core zone. Users are required to provide a message to explain why data is uploaded directly to the Core zone.
b. Example: a file of TEST_csv.csv can be uploaded from user's Home Directory into a folder of uname within Project of Indoc Test Project Core zone by typing vrecli file upload ./TEST_csv.csv -p indoctestproject/uname -z core -m "workbench output"
You are about to transfer data directly to the VRE Core! In accordance with the VRE Terms of Use, please confirm that you have made your best efforts to pseudonymize or anonymize the data and that you have
the legal authority to transfer and make this data available for dissemination and use within the VRE .To review the Terms of Use, please visit https://vre.charite.de .If you need to process the data to remove
sensitive identifiers, please cancel this transfer and upload the data to the Green Room to perform these actions.
To cancel this transfer, enter [n/No]
To confirm and proceed with the data transfer, enter [y/Yes]
[y/N]: y
Starting upload of: ./TEST_csv.csv
Pre-upload complete.
uploader: uname container_id: 37 total_size: 303684 total_chunks: 1 uniq_identifier: f45fbb58-c135-4b94-a224-9bcd469a08ee-1631558977 resumable_relative_path uname/
Upload job is finalizing, please wait...
Upload job complete.
All files uploaded successfully.
c. Example 02: a file of TEST_csv.csv can be uploaded from user's Home Directory into a folder of uname within Project of Indoc Test Project Core zone, and build a data lineage with a source file testing_data.png in a folder of uname within same Project Core zone and with a pipeline name of testing_pipeline by typing vrecli file upload ./TEST_csv.csv -p indoctestproject/uname -z core -m "testing" --source-file uname/testing_data.png --pipeline "test_pipeline"
You are about to transfer data directly to the VRE Core! In accordance with the VRE Terms of Use, please confirm that you have made your best efforts to pseudonymize or anonymize the data and that you have
the legal authority to transfer and make this data available for dissemination and use within the VRE .To review the Terms of Use, please visit https://vre.charite.de .If you need to process the data to remove
sensitive identifiers, please cancel this transfer and upload the data to the Green Room to perform these actions.
To cancel this transfer, enter [n/No]
To confirm and proceed with the data transfer, enter [y/Yes]
[y/N]: y
Starting upload of: ./TEST_csv.csv
Pre-upload complete.
uploader: swang project_code: indoctestproject total_size: 303684 total_chunks: 1 resumable_relative_path admin
Uploading TEST_csv.csv: |██████████████████████████████ 100% 00:00
Upload job is finalizing, please wait...
Upload job complete.
All files uploaded successfully.
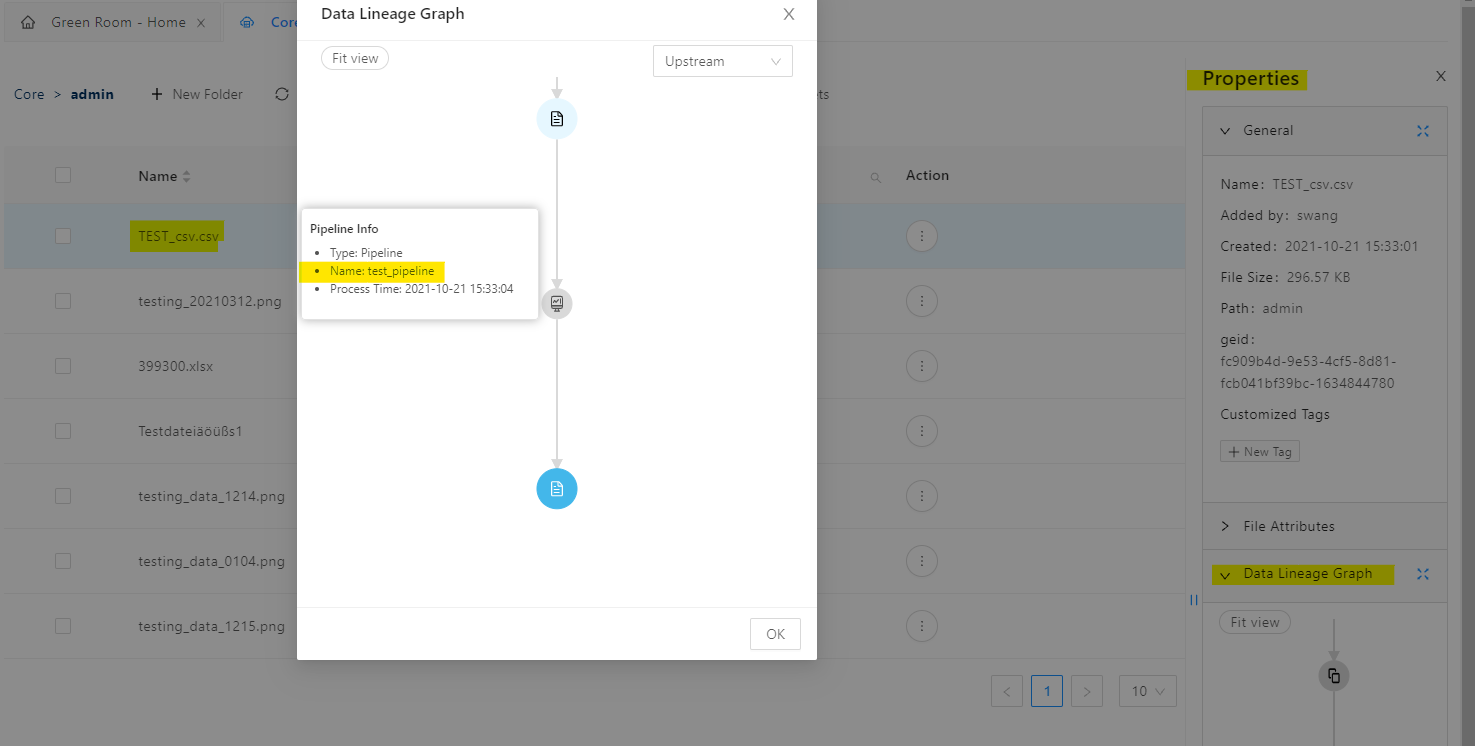
The Data Lineage Graph in Properties of file TEST_csv.csv or testing_data.png will display the lineage between testing_data.png as a Upstream file, testing_pipeline as a Process, and TEST_csv.csv as a Downstream file linked within the lineage graph:

Copyright © 2022, Indoc Research. This work is licensed under a Creative Commons Attribution-ShareAlike 4.0 International License.